52 Week Mini Art Card/Tag Challenge
Every week, since the start of 2016, I have provided a prompt for the 52 Week Mini Art Card / Tag Challenge, which I have thoroughly enjoyed.
Now that the 2019 challenge has come to an end, I have decided not to run the challenge for 2020.
Hubby has recently retired and we want to be able to go away at the drop of a hat... or when the sun shines in the camper van.
The Facebook Group will remain open, so if you want to contribute to previous years prompt albums you can do.
The full list of prompts for the past three years can be found here.
I would like to take this opportunity to thank you for your interest in my tag challenge. Sam xxx
I just wanted to take this opportunity to thank you for your continued interest in my little blog of makes, I really do appreciate every click on to my blog and the comments made.
Our Christmas will be in two halves, a quiet one on Christmas Day and then a more noisier affair between Christmas and New Year when the Grand Children come to visit, which I can not wait for!
I hope you have a very Merry Christmas and wish you all the best for 2020.
Sam xxx
If you are still with me up to now, you'll be releieved to know this is the final prompt of 2019. It has been another fabulous year and you need to pat yourself on the back for all the fabulous tags you have made over tha past weeks.
The final prompt is "Celebrate the end"
For my tag, I used black card stock and a Funky Fossil "Circle Burst" stencil. I used several different mediums through the stencil, including acrylic paint Sakura Gelly Roll Pens and Signo glitter pens. I added gem stones, sequins and glitter too.
For the sentiment I used a Stampers Anonymous stamp heat embossed using Wow! clear embossing powder with their "Super Fine Metallic Silver embossing powder".
~~~
Check out the challenge Facebook Group here.
I have continued my play with Visible Image goodies, creating this little underwater scene.
This is a small card, with the actual coloured centre measuring approximately 12 x 8 cm. While tidying a file I keep my gelli plate backgrounds in, I came across this off-cut. I was so close to throwing it in the bin , but decided to create something with it instead.
I don't recall the specific colours I used to create the gelli plate background, but before I started stamping there were soft green splodges on a pale blue background, which kind of lent itself to a watery scene, which lead me down this path.
I used the Visible Image "Dare To Swim" clear stamp set and a selection of Versafine Clair inks through out this project.
I started by stamping the sea weed in "Verdant" light green ink. I then stamped the shoal of fish in "Morning Mist" grey ink.
Next I stamped the jelly fish, using "Twilight" a dark blue coloured ink.
I decided I needed another colour of sea weed, so used "Shady Lane" which is more of an olive green shade, colouring the sea weed with coloured pencils.
I then stamped air bubbles using "Warm Breeze" a turquoise coloured ink. I coloured the air bubbles with a white Posca Pen.
I moved on to colouring the jelly fish itself, using a selection of Signo and Sakura Gelly Roll Pens.
I mounted the image onto navy blue card and then onto a plain white card blank. I stamped the last line of the sentiment vertically in "Twilight" ink.
This evening, I had an urge to play with my Visible Image stamps and stencils, creating this card, where I used stamps from three sets and a stencil too.
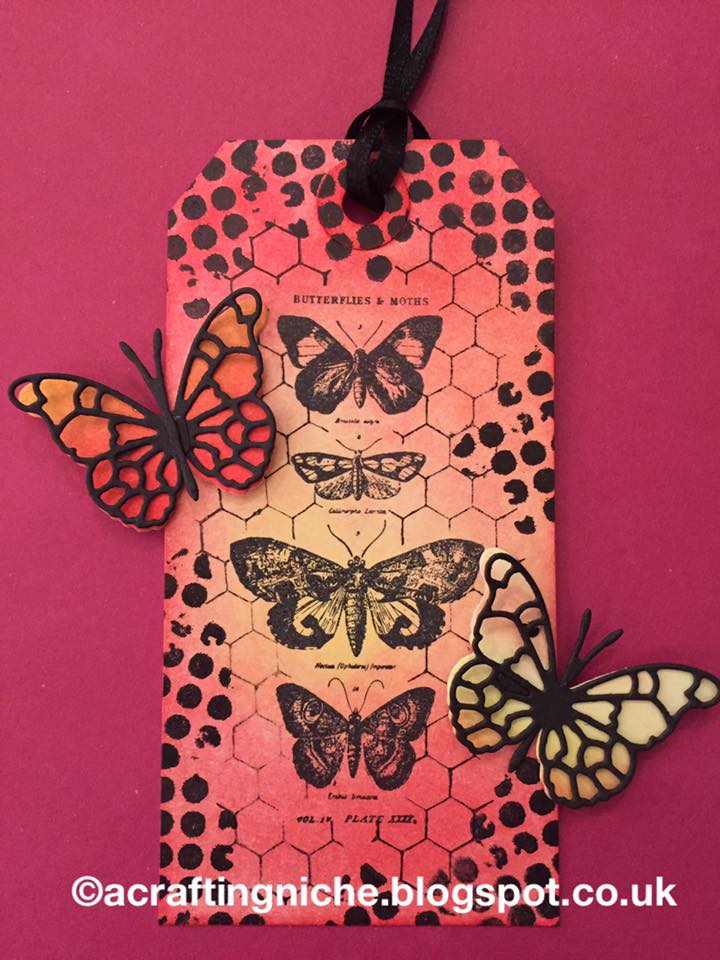
I started by using three shades of Distress Oxides Inks (Worn Lipstick, Picked Raspberry and Ripe Persimmon) through the Visible Image "Entwined Butterflies" stencil.
After removing the stencil, I stamped the large butterfly from the Visible Image "Wings of Change" on to the card, using Versafine Clair "Nocturne" ink.
While I had the stamp out, I stamped the same butterfly, three times on to white card using "Charming Pink" Versafine Clair Ink.
I also created three masks of the butterfly by stamping onto post-it notes. I fussy cut the post-it butterflies and adhered them over the butterflies stamped on to the card.
Next, using Versafine Clair "Nocturne" black ink I stamped the main image from the Visible Image "See Everything" clear stamp set. I also stamped the central eye section onto a white piece of cardstock for later use.
I filled the areas to the side of the central image using a stamp from the Visible Image "Creative Chaos" stamp set, again stamped in "Nocuturne" black ink.
Returning the iris eye area stamped on a white card, I painted the eye itself with "Mermaid Lagoon" blue/green coloured Distress Oxide Ink, cut out a rough oval and adhered the eye over the one already stamped on the card. I then covered the iris in Glossy Accents to give a glassy appearance.
I then glued the white butterflies into position. I decided that some of the dots needed to be filled, I used a black marker pen and a white Posca Pen along with a green Sakura Gelly Roll Pen which matched the matting and layering.
A few weeks back I had been playing with the Funky Fossil "Snow Flurry" Stencil, inking the surface and then spritzing water onto it, then printing the impression onto a plain piece of card. The background of this card is one from that play session, where I have inked the stencil with two shades of Distress Oxide Inks: Mermaid Lagoon and Wilted Violet shades. I like the mottled look this achieves.
I then stamped the angel from the Funky Fossil "Folksy Christmas" Clear Stamp Set on to the bottom right hand corner of the card. I then stamped the image again on an off-cut of white card.
Using Versafine Clair "Twilight" dark blue ink, I stamped the words, Love, Peace and Joy across the background, these words form part of the "Folksy Christmas" stamp set.
I then stamped some snowflakes in the two shades of Distress Oxide Inks I mentioned earlier (Wilted Violet and Mermaid Lagoon.
Returning to the angel stamped on the white card, I cut out the head and dress area, colouring with water colour pencils. I then adhered it with foam pads over the angel image stamped on the card, which gives a nice 3D look, especially with the wings in the background.
Here's a quick make if you've run out of Christmas cards.
I used "Chipped Sapphire" Distress Oxide Ink with a blending tool through the Funky Fossil "Snowfall" stencil to create the background.
On a separate off-cut of white card, I stamped the word "Noel" which is part of the Funky Fossil "Fa La La" clear stamp set, in a vibrant red Versafine Ink called "Tulip Red".
I die cut both the background and the "Noel" in a square with a stitched detail. Layering onto the plain card base. I used foam pads to adhere the "Noel" topper to give a 3D look to the card.
Here we are, the penultimate prompt of the year! I have no idea where this year has gone to, it really has sped past.
Week 51 prompt is: "Christmas Tree"
It's been a bit of a busy few days as I've been away, so I kept my tag pretty simple, opting for a snow forest scene with a snow storm.
I created the background, using a torn edge of paper and a Distress Oxide Ink in the pale blue (Tumbled Glass) shade and Versafine grey ink.
I coloured the sky with "Chipped Sapphire" Distress Oxide Ink and the moon with "Scattered Straw" Distress Oxide Ink.
Using Versafine Clair "Shady Lane" green ink, I stamped the trees (Designs by Ryn "Stylized Tree Set).
I then used white Gesso and a fan brush to splatter the tag to create the snowstorm. There must have been a small amount of red ink in the brush as some of the splatters have a pink tinge, which I quite like.
Finally, I added a tiny bit of sparkle using a silver glitter Signo Pen too.
I'd ordered a die, just over a week ago on-line from an American company called "123Stitch.com" The die wasn't available to purchase in the UK, but fortunately it arrived yesterday - what fab customer service for it to arrive so soon, so of course I had to have a play.
The die in question is a "Memorybox Large Circle Burst Die" which I ran through my Sizzix Big Shot to create the circular dot pattern. I then mounted it on to a piece of cerise pink card (excluding the inner circle area).
On the inner circle, I stamped a little bunny from the Funky Fossil Designs "Woodland Wishes" clear stamp set, using Versafine Clair "Morning Mist" grey ink, (I didn't want the outline to be too harsh which I would have got had I used black ink). I also stamped it a second time on an off-cut of white card.
I coloured the image on the off-cut of card using my Arteza coloured pencils. I cut out the image and mounted it over the bunny stamped on the circle using Stix2 clear foam pads. I then mounted the circle onto the card using Stix2 clear foam on a roll, this gave the card some dimension.
Finally, using a Personal Impressions sentiment stamp from their "Double Sayings - PICSA6104" set I stamped "It's a girl" using Versafine Clair "Charming Pink" ink.
It is time for another challenge theme on the "My Time To Craft Challenge Blog". Challenge #412 is "Christmas Flowers". If you have a moment to spare, please do pop over to the blog and take a look at the fabulous makes by my Design Team colleagues and maybe enter the challenge yourself.
For my card, I used a cream card base and stamped the Hobby Arts Ltd "The Holly & The Ivy - SC137D" in Versafine "Olympia Green" and the sentiment in Versafine Clair "Chianti" dark red shade of ink.
I coloured the card by painting Distress Oxide Inks, using the following shades: Shabby Shutters, Mowed Lawn, Peeled Paint, Pine Needles, Lucky Clover, Antique Linen, Barn Door and Aged Mahogany.
For the 3D flowers I used layers of some Bazzill Basics paper flowers, curving the leaves and using a silicon glue to provide dimension.
Finally, I added some sprarkle by using some Lavinia Stamps Hollographic Moon Dust, which is quite a chunky glitter but gives a lovely sparkle.
This is the third sample I have made to promote the Lavinia Stamps December 2019 monthly challenge. The challenge runs from the 1st to the 25th of the month. The theme for this month is "Snow at Christmas".
You can enter the challenge to a maximum of five times. If your name is randomly drawn, then you will win £40 of vouchers to spend on lovely Lavinia goodies.
I wasn't really sure where I was going with this card when I first started making it. The first thing I did was to randomly stamp the "Faerie Spells" sentiment in Versafine Clair "Twilight" darlk blue ink.
On a seprate piece of white card, I stamped the "Fairy Hive" in Versafine Clair "Warm Breeze" which is a teal coloured ink.
I then stamped the fairies to each side of the hive, using two from the "Fairy Foragers" set, stamped in Versafine Clair "Twilight" ink.
I then started work on the background. I put some "Tumbled Glass" Distress Oxide Ink on my mat and added a little water and applied to the background of the hive like a thin pale blue wash,
Using the following Distress Oxide ink colours, I painted daubs (is the closest thing I can call it) in Spun Sugar, Stormy Sky, Faded Jeans and Chipped Sapphire. I wanted to create a soft coloured speckled/snowy sky look to the background. I then added dots of white using a Posca pen.
I stamped the "Have a fairy merry Christmas" sentiment in Versafine Clair "Twilight" ink. I coloured the lantern held by the fairy and also the window of the fairy hive with a yellow Posca Pen.
Finally, I added "Hollographic Moon Dust" to the panel to add an extra icy snowy look to the card.
I've not had a play with my Visible Image stamps for some days, so decided to address it this evening making this card. You may recall I had a significant purchase from their Black Friday sale, so I have used some of the new goodies on this card.
I found an off-cut of a Brusho background I'd made some months ago, so decided to make use of it for this. It had peach and blue tones.
I decided to use "Blueprint Sketch" Distress Oxide Ink through the Visible Image "Fibres" stencil in the central area of the card,
Using the wings from the Visible Image "Faerie Magic" clear stamp set, I stamped them first in Versafine Clair "Twilight" dark blue colourd ink onto the card. I then stamped them onto a piece of vellum using a StazOn Ink called "Blue Hawaii".
I coloured the vellum wings with a silver glitter Signo pen, then fussy cut them out, adhering partially over the stamped wings on the card, to create a more layered look.
On plain white card, I stamped the heart shape, which is part of another Visible Image stamp set called "Don't Judge" in Versafine Clair "Twilight" ink.
I coloured both hearts with Distress Oxide Inks, one with "Wilted Violet with Chipped Sapphire" and one with "Mermaid Lagoon" shade of inks. I then cut both out. I adhered the darker purple looking heart on to the card.
Using the "Mermaid Lagoon" coloured heart, I stamped the safety pin/fracture across the heart to create to create an impression that the heart is being held together. Again, I used Versafine Clair Twilight and coloured the safety pins with a silver Sakura Gelly Roll pen. I added clear foam hearts to the back and then adhered over part of the purple heart.
The "A Little Bit Broken" sentiment is also from the Visible Image "Don't Judge" clear stamp set and I used the Twilight ink again for that.
Finally, I added some silver dots to the stamped background wings and then darkened the edges of the card, using a finger blender with Versafine Clair" Twilight" ink.
The prompt for Week 50 is "Greenery".
For my tag, I've used a selection of Lavinia Stamps on a white card tag base.
I started by stamping the building/door way, which is a stamp called "Hide and Seek" and the "Path" in Versafine "Smokey Gray" ink. I then coloured the building with "Pumice Stone", the path with "Hickory Smoke", the ground either side of the path with "Tumbled Glass" and the door with "Walnut Stain" Distress Oxide Inks.
Next, I stamped the berry arch over the door, using both sections of the "Berry Wreath" in Versafine "Olympia Green" ink. I coloured the berries with a mix of two Distress Oxide Inks: Candied Apple and Aged Mahogany.
I then turned my attention to the foliage stamping the "Climbing Ivy" and the "Creeping Vine" in Versafine Clair "Rain Forest" green ink.
I decided to make the top of the tag more green, so I used the "Forest Moss" Distress Oxide Ink with a blending tool to add more colour.
Finally, I added some sparkle to the snowy area either side of the path by using some Lavinia "Holographic Moon Dust".
On the first of every month, Lavinia Stamps announce their new monthly challenge theme. For December 2019 the theme is "Snow At Christmas".
If you enter the challenge, (you can enter up to five times), and your name is randomly drawn after the 25th of the month, then you win £40 of vouchers to spend on lovely Lavinia goodies.
For my Design Team sample card, I started by stamping the "Small Fairy Fir Tree" and "Small Fairy Fir Tree 2" in Distress Oxide Inks, in the shades of Iced Spruce and Weathered Wood.
Using the torn edge of a piece of copy paper, I created the landscape using Versafine "Smokey Gray" and Distress Oxide "Tumbled Glass" inks. I masked off the spotlight/moon area and edged it with the Versafine "Smokey Gray" ink too.
I stamped "Oona" the fairy in Versafine Clair "Twilight" dark blue ink. Using the same ink, I stamped the "Spirit of Christmas" sentiment, broken up into two separate lines.
For the snowball by the hand of "Oona" the fairy, I stamped one of the "Bubbles" in Versafine "Smokey Gray" coloured ink. Using the same ink, I stamped two of the "Fairy Orbs", to create the impression of a snowman.
I drew on the face and scarf of the snowman, colouring the scarf in a bright red shade of ink.
For the arms of the snowman, I used part of the "Fern Branch" stamped in Versafine Clair "Twilight" ink.
Around the fairy, I added some stars using a pound stamp, stamped in Memento "London Fog" grey ink.
Finally, I grounded the trees, snowman and fairy using pencil shading. I added a touch of sparkle by using a silver sparkle Signo pen.
Today I received an order I'd placed with Funky Fossil Designs. I'd realised there was one stamp set that I didn't have, so thought I should add it to my collection. It's the "Beautiful Inside and Out".
I stamped the Funky Fossil "Beautiful Inside and Out" floral branch image in Versafine "Smokey Gray" ink. I then used the same ink to stamp a Papertrey Ink sentiment within the floral wreath.
Using the following Distress Oxide Inks, I painted the floral wreath (Tattered Rose and Victorian Velvet for the flowers and Tea Dye and Walnut Stain for the branches).
I then painted the backgroud using "Weathered Wood" Distress Oxide Ink.
I lay the Funky Fossil "Crackle Background" Stencil over the prepared image, using low tack tape to keep it in position. I then applied "Iced Spruce" Distress Oxide Inks with a finger blender, this allowed me to get cover into the smaller areas around the wreath.
Finally, using a gold shimmer Sakura Gelly Roll pen, I outlined the wreath to give a very subtle shine to it.
I've used a selection of Funky Fossil stencils and stamps to create this card.
I had quite a session creating the background. In my head I was thinking of tartan. It ended up ok but not quite what I originally had in mind, in hindsight maybe I should have used a red and the light brown rather than a brown and a dark green, but we learn from our mistakes.
I started with plain white card which I covered with Twisted Citron Distress Oxide Ink, applied with a blending tool to cover the whole area.
I lay the Funky Fossil "Crackle Background Stencil" over the green base, using low tack tape to keep in position and covered with "Mowed Lawn" Distress Oxide. Then removed the stencil.
I then taped into postion the "Simply Stripes Stencil" and used a "Peeled Paint" Distress Oxide ink through the stencil.
I lifted the stencil, rotated the card and then re-adhered the stencil into postion, this time using a "Brushed Corduroy" Distress Oxide Ink, then removed the stencil.
I still felt that the pattern needed something more, so I used a further Funky Fossil Stencil called "Micro Dots" this time with a "Walnut Stain" Distress Oxide Ink.
I then turned my attention to the stamped dog, which is part of the Funky Fossil "Pugs and Hugs" clear stamp set using Versafine "Vintage Sepia" ink.
I then used a paint brush and a selection of Distress Oxide Inks (Tea Dye, Brushed Corduroy and Spun Sugar) to colour in the image. I used a black marker pen for the eyes. I fussy cut the pug image and adhered onto the bottom right hand corner of the card.
I used Verafine Clair "Acorn" ink to stamp the "You're Pawsome" sentiment, which is also part of the "Pugs and Hugs" clear stamp set.
Finally, I mounted the image on brown card before adding it to a cream card base. I then added "Glossy Accents" to the eyes to give the impression of them being wet and watery looking.
It feels a little odd with no colouring today, I must be suffering withdrawal symptoms. I may just have to do some later regardless.
This photo shows all my makes from "The Daily Marker Thirty Day Colouring Challenge - November 2019" together. I am so pleased that I stuck with it.
It is Week 49 of "The 52 Week Mini Art Card / Tag Challenge 2019". The theme for this week is "A Vintage Style Christmas".
For my tag, I started with a cream coloured tag, using two shades of Distress Oxide Inks, Tea Dye and Walnut Stain.
I used a Stampers Anonymous stamp set called "Mini Holidays 4 - CMS142' in Versafine Clair "Chianti" for the crackle background and the sentiment. Using Versafine Clair "Shady Lane" for the holly sprigs.
On separate card, I stamped the Crafty Individuals "Spring Time Background - CI-194" music sheet and the "Angel - CI211" in Versafine Clair "Chianti" ink, I aged the card by using the two brown Distress Inks I had used on the background.
After assembling the tag, I used the Lavinia Stamps "Moon Dust" which is a very fine two tone soft glitter to add some gentle sparkle to the tag
On the first of every month, Lavinia Stamps announce their new monthly challenge theme. The theme for December 2019 is "Snow At Christmas".
If you enter the challenge (you can enter up to five times), and your name is randomly drawn, you will win £40 of vouchers to spend on lovely Lavinia goodies.
For my card, I started off creating a background using a selection of Distress Oxide Inks. I used the swooshing technique and a paint brush to get this look.
I then stamped the "Shanty", using Versafine Clair "Twilight" which is a dark blue ink. At first I stamped direct onto the card and then the second time on to a piece of rice paper.
At the top corner of the rice paper, I wrote right side in pencil, to remind me which way round was the right way. I then flipped the rice paper over and started to colour the background using Arteza Brush Pens.
I then tore the edges of the rice paper so that there were no straight edges and pasted PVA glue on to the back. I then flipped it over and very carefully positioned the shanty over the original stamped image on the card.
The reason for me using the rice paper, was that I was able to achieve better colours to the shanty, rather than them beind distored by the Distress Oxide background.
Using the same "Twilight" ink, I stamped "Rory" from the "Rory and Darcy set". His image didn't come out very cleanly, so I went over his image with a green Sakura Gelly Roll pen, which made him colour match that used on the shanty - so a happy accident!
I stamped the "Every Dream" sentiment in two lines across the large moon, using Versafine Clair "Twilight" ink.
I used a white Posca pen to create snow flakes, but it didn't really stand out very well, so I decided to get busy with the "Lavinia Holographic Moon Dust" to add some icy sparkle to the card.
I decided the foreground looked a bit bare, so I added some dots of "White Opal" Liquid Pearls. As I was moving the card to the side to dry, I managed to drop it and smudge the wet white pearl droplets. To cover the error, I used some green Liquid Pearls called "Mermaid", which very handily matched the colour of Rory and the door, so another happy accident.
It's the last day of "The Daily Marker Thirty Day Colouring Challenge".
I am one of those people that when I set my mind on something like a challenge, that I generally see it through to the end. But I am glad that I have managed to do all thirty days as November has been a busy month of makes with Design Team work and several occasions to make cards for.
For my card, I have used a Penny Black stamp called "Caroling Bunch - 1867K" which is part of the year 2000 Margaret Sherry Collection. I've coloured the stamped Versafine Ink image with water colour pencils.
It's the penultimate day of "The Daily Marker Thirty Day Challenge".
For my Day 29 card, I have used a Penny Black 2006 stamped image called "Snow Trot - 3540H", stamped in Versafine Ink. I have coloured the image using water colour pencils and popped it onto an embossed bubble background, using a Crafter's Companion "Scattered Dots" embossing folder.
There is a new challenge theme on the "My Time To Craft Challenge Blog". Challenge #411 has a theme of "Christmas Scene". This is the card that I made to help promote the challenge as part of the Design Team.
For the background, I repeat stamped a Lavinia Stamps "Christmas Words" stamp in Versafine Clair "Medieval Blue". I used the same ink to stamp the main image. I don't recall who makes this stamp as I have had it for some years. I coloured the star with Distress Oxide Ink in a shade called "Wild Honey".
This evening, I've had an opportunity to play with another one of my new stamp sets from Visible Image. This time I've used "Erika's Maple". This stamp set was made in memory of fellow crafter Erika Philpott, who was a huge fan of Visible Image products.
I used a background of swooshed Distress Oxide Inks in the following colours: Ripe Persimmon, Fossilized Amber and Mustard Seed.
I stamped the large maple leaf in the middle of the card. I then stamped the rays around the top of the leaf. This stamp is from another Visible Image stamp set called "Set The Tone" stamped in Versafine Clair "Chianti" ink.
I used the same ink to stamp the dots on the lower half of the card. The dot stamp is also part of the Visible Image "Set The Tone" stamp set.
I painted Distress Oxide "Aged Mahogany" ink between the rays and then added a shimmer by using a gold Sakura Gelly Roll pen.
In the lower left hand corner of the card, I have stamped a Visible Image sentiment "Picking Up Th Pieces" which is part of the "Don't Judge" stamp set, stamped in Versafine Clair "Nocturne" ink.
Using a paint brush, I painted the leaf in a selection of Distress Oxide inks: Mowed Lawn, Wild Honey, Fired Brick and Candied Apple.
It's Black Friday and Funky Fossil Designs are offering a fabulous 20% off all products when you use this voucher code "SAVE20" between the hours of 8am Friday 29th November and midnight Monday 2nd December.
I made this card using an assortment of Funky Fossil products.
I started by putting some "Antique Linen" Distress Oxide Inks onto my craft mat and spritzing with a little water. I then swooshed my plain card through the ink in different directions to coat the card.
I did the same using "Shabby Shutters" Distress Oxide Inks, filling the remaining white areas using a paint brush. This provided a lovely mottled aged look for the background.
I masked the coloured area with the Funky Fossil "Crackle Background" stencil and used "Pumice Stone" Distress Oxide ink through the stencil with a blending tool. I only coloured the corners and the very edge of the area, leaving the middle clear for stamping later.
I removed the crackle stencil and replaced it with another Funky Fossil stencil called "Holly Wreath". At first I used a shade of Distress Oxide called "Peeled Paint" through the stencil, but it looked too dull, so I went over it with another Distress Oxide Ink called "Mowed Lawn" which I was happier with.
I then moved on to the central area of the card. I decided to use the sentiment from the Funky Fossil "Fa La La" clear stamp set. I stamped the "Merry Christmas" section of the sentiment in Versafine Clair "Chianti" dark red ink. The small holly branch above and below, I stamped in Versafine Clair "Shady Lane" green ink.
To finish the card, I added some gold dots around the central sentiment and added some holly berries using Liquid Pearls in a shade called "Ruby Red".
Visible Image have a fabulous "Black Friday Sale" on at the moment with up to a massive 70% off, so of course I had to take advantage of such a great offer.
I had remembered that last year they had a similar offer, so I have held off buying their more recent designs in the hope they may be reduced. My patience was worth the wait, as you can see from the photo of my purchases below. Fortunately, Hubby has two expensive hobbies, so I didn't feel the need to justify the spend.
I had a little window of crafting opportunity today, so made a quick card with a Brusho turquoise coloured background I had made previously.
I decided to use the Visible Image - Stay Wild set, that I had purchased earlier in the week. I stamped the main horse image in Versafine Clair "Nocturne" black ink.
Using the same ink, I stamped the lower section of the sentiment, using the "Don't let them tame you" section of the stamp at the top of the card.
I wanted to break some of the Brusho turquoise background out, so used a white Posca pen to add some lighter areas.
In the Visible Image "Mythical Mermaid" stamp set, there is a border section that says water and bubbles to me, so I stamped that along the bottom of the card and partially up the side. I coloured the bubbles in two shades of blue Posca Pen. I also used a silver sparkle Signo pen to add a different colour to lift the water spray.
The end of "The Daily Marker Thirty Day Colouring Challenge" is in sight, just two more and then it is done and dusted. As you may have noticed, I don't follow the daily prompts. Today is brown and I don't really do brown, so I've used colours that please me.
I decided to opt for a tag today and this one I've created screams Christmas to me, which makes me happy.
I started off by using a stamped image from a Penny Black wood mounted stamp called "Joy! - 2258K" which was a 2001 Donna Klotzie design. I stamped the image in Versafine and coloured it with Distress Oxide Inks.
I used a Distress Oxide Ink called "Pine Needles' to colour the edges. I then popped an "Andy Skinnner - Tornado Stencil" over the top and using a wet wipe, removed some of the ink, which gave the lovely swirl look in the background.
Finally, I used some white Gesso on a fan brush and gently tapped the brush so that droplets fell on to the tag to replicate snow. A red ribbon finishes the tag beautifully.
I've been playing with some Funky Fossil MDF shapes to create this house shaped hanging decoration/tag.
I had the remains of an old paint tester pot in pale blue, so I painted the "Funky Fossil MDF Hanging Decoration" and left it to dry.
While the house shape was drying, I coated the "Funky Fossil MDF Stag shape" with PVA glue (applied with a finger), then sprinkled Cosmic Shimmer "Golden Sand" glitter over it and left it to dry.
Returning to the now dry pale blue MDF house shape, I placed a "Funky Fossil Snow Flurry Stencil" over the shape and brushed a white acrylic paint over the stencil, which left a snowflake background detail. I set aside the piece to dry.
Once dry, I decided the blue paint looked too perfect, so I used a brown coloured Arteza Brush Pen to add a more distressed look to the edges of the house shape.
At this stage, I decided I wanted the heart shape to look warmer, so I adhered a piece of pinky/coral coloured paper to the back of the house shape.
I then added some Lavinia Stamps "Holographic Moon Dust" over some dots of PVA glue. While the PVA was out, I adhered the glittered stag shape on to the house too.
This is my card for Day 27 of "The Daily Marker Thirty Day Challenge". I've used a Penny Black stamped image from their "Relax and Enjoy" clear stamp set. Stamped in Versafine ink and coloured with Distress Oxide Inks.
My friend celebrates her birthday later this week. Some months ago, when she was looking at the cards that I had made, she commented on how she liked the Lavinia Stamps "Rory & Darcy" and that if I made a birthday card for her, could I include them on it. Fast forward six months and i've created what she asked for. Hope she likes it.
For this card, I used a gel plate background that I had created some time ago, with a blue and mauve colours.
I started stamping the bottom green area, using the "Ivy Border Stamp" stamped one row on top of the other using Versafine Clair "Verdant" green ink.
I then stamped the "Sacred Spells" verse in the background using Versafine "Smokey Gray" ink, I stamped it three times across the card. At this stage, I masked off a spot light/moon area using Versafine Clair "Charming Pink" shade of ink.
Using Versafine Clair "Fantasia" purple ink, I stamped "Raven" on her branch the extra branches using the"Tree Branch" and the "Birds".
I used the "Fairy Barnacle" stamp, stamped at the base of the card using Versafine Clair "Charming Pink" ink. I then stamped the "Fern Heads" in Versafine Clair "Shady Lane" green ink.
I stamped the "Rory and Darcy (the set)" characters, standing on the Fern Heads. I stamped Rory and Darcy in Versafine Clair "Fantasia" purple ink. Using the same ink, I stamped the "Climbing Ivy" in the bottom right hand corner.
Using Versafine Clair "Purple Delight" shade of ink (which is more pink than purple), I stamped the "Star Burst" pods. I used the same ink to edge the card with.
Finally, I used a white and a silver glitter Signo pen to add highlight areas. I also used Lavinia Stamps "Holographic Moon Dust" to areas of the fairy wings and the Star Burst Pods to add sparkle to the card.